Thursday, December 9, 2010

Buzz Lightyear

I realize how late I am in posting this tutorial, but hopefully it will be useful for next year's Halloween! My son is obsessed with all things Toy Story, and most of all with Buzz Lightyear. The base of this costume is a white hooded sweatshirt and white sweatpants. I love working with sweatshirt material and felt for costumes, the biggest drawback is bulkiness. I almost wish I had used a sweat suit in a size smaller so it would fit better. But on to the tutorial!

Materials:
  • 1 (white) hooded sweatshirt
  • 1 (white) pair of sweatpants (I purchased mine online from hanes.com)
  • 1 (white) pair of gloves
  • 1 yd of green felt
  • 1/4 yd of shiny silver material (or use gray felt
  • 3/4 yd of purple felt
  • 1 yd of white felt
  • 1/2 yd of black felt
  • Square of yellow felt
  • Square of red felt
  • Square of blue felt
  • Thread to match all of your felt (white, green, yellow, black, red, & blue)
  • Foam core board
  • Purple and Red ductape
  • Sticky backed Velcro
  • Polyfill (stuffing)
Pants

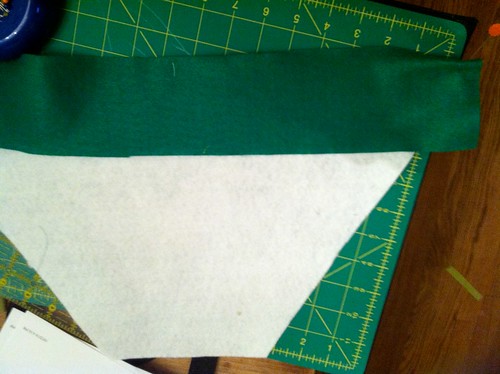
The pants were the easiest part of the costume. I wanted to add "spat-like" parts to the bottom, kind of like adding a bell bottom with green on the edge. I also added a belt of the green at the top of the pants. I cut a trapezoid shape that was approximately twice the circumference of the existing pant bottom. The top of the trapezoid is the front of the pant width at the knee. The height of the trapezoid is from the knee of the pant to approximately 3 inches past the pant bottom. You want these "spats" to cover the tops of your child's shoes.

I then added a 3 in wide strip of green felt to the bottom of the  trapezoid.


I then positioned the top of the trapezoid where I wanted it to be on the pant.

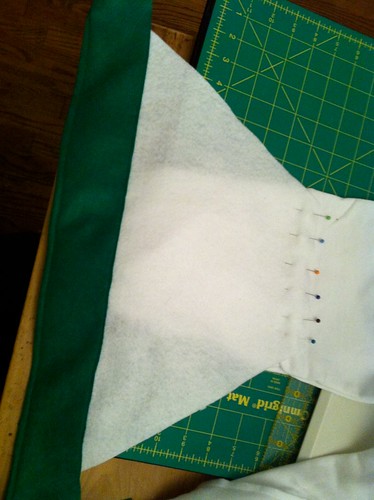
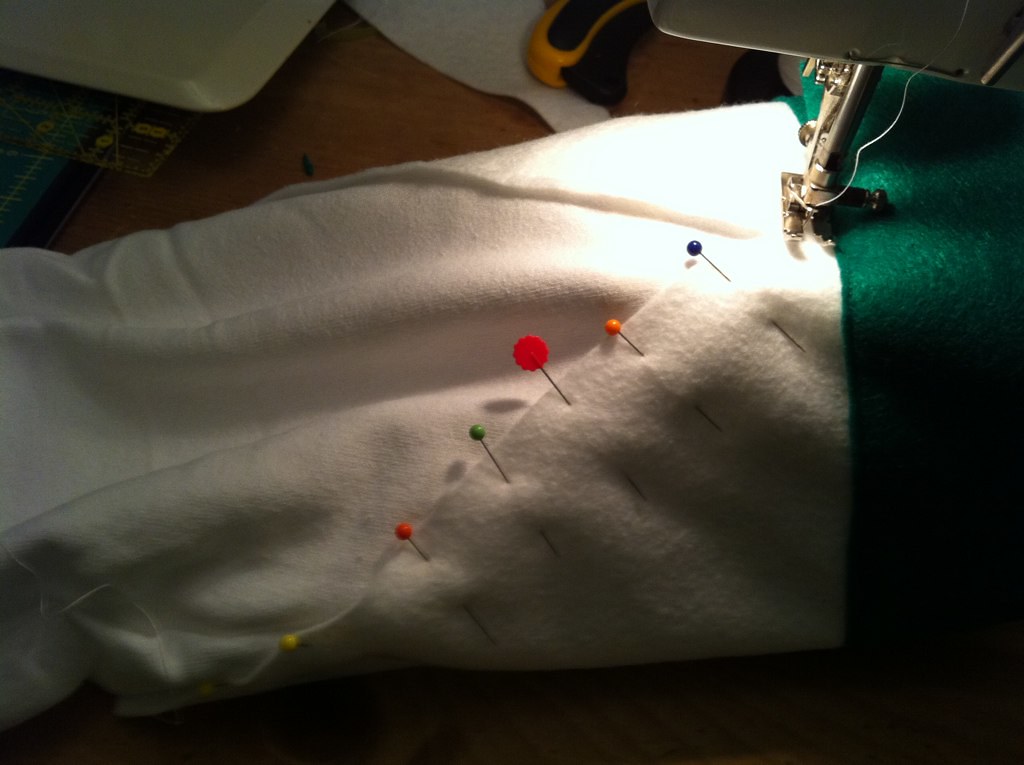
I then top-stitched the "spat" to the pants. The great thing about felt and matching thread is that I didn't worry about hiding my seams.

Then I pulled the "wings" of the "spat" (way too many quote marks - sorry) around to the back of the pant and sewed those down as well. Sew only the white down on the back of the pant (the sides of the trapezoid, so that the "bell" of the spat can cover the shoe.
I then added a 4 in wide belt for the pants.
 
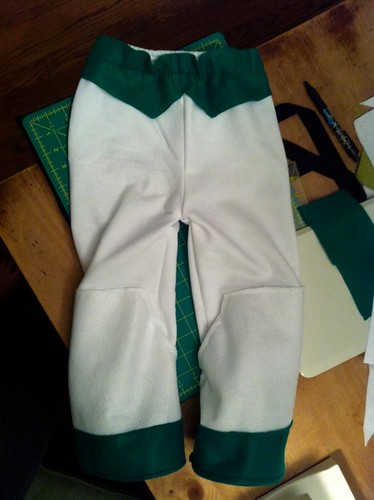
Since the sweatpants have an elastic waist band, sewing down the belt will create a few bunches. I waited until after I added the belt to cut the front section out so that it would be centered.

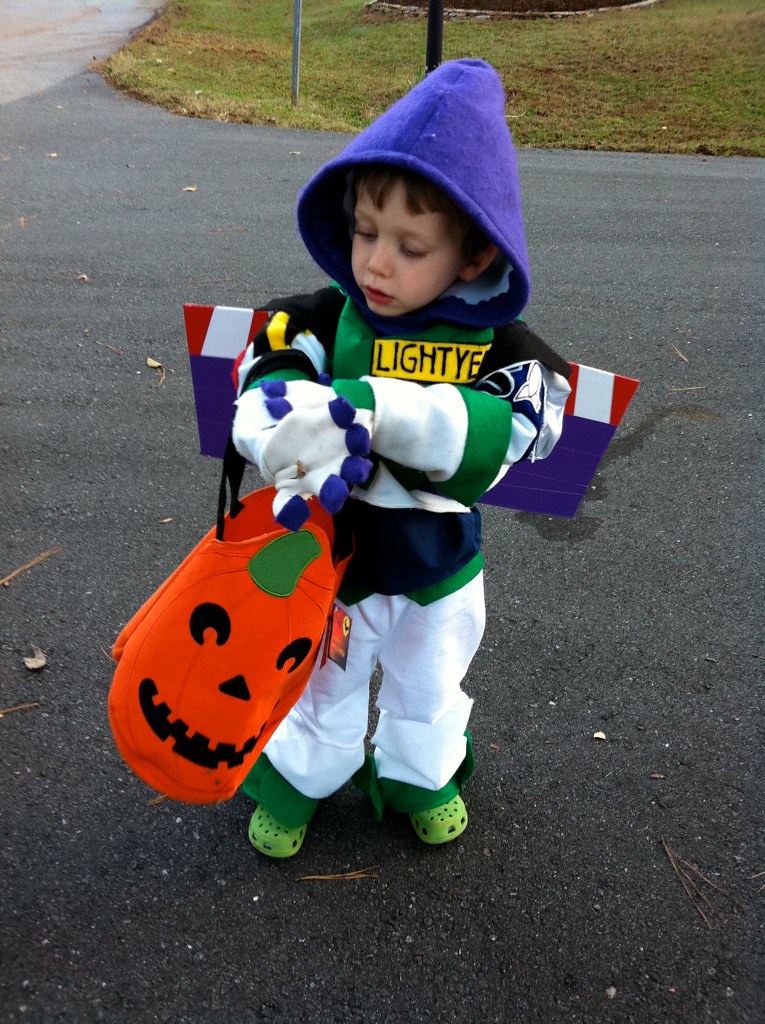
And Yeah! Pants done! Let's move onto the top, which will be in my next post!

Sunday, November 28, 2010

Halloween Costumes

One of the fondest memories I have about Halloween as a child is working with my mother on making my costume. We would keep all of them and use my old costumes for dress-up throughout the year. Since my son was born I have been wanting to keep with this tradition and for the past two years I have been able to actually do it. Last year my son was Nemo from Finding Nemo. I'm not the best with clothing, so I used an orange sweatshirt as a base and felt for the embellishments.  Have you ever worked with felt before???  After all my years with cotton and quilting it was a dream to work with felt, it was so easy to work with.  I was really happy with my result, and so was Evan - he slept in it for a couple nights :) This year I submitted it to Ohdeeho as part of their Halloween roundup, and was listed on their site! I didn't really take pictures of my process, so for this year, Evan was Buzz Lightyear, I have a tutorial I will be posting about next!

MIA - but I have a good excuse....

I've been Missing In Action for over a month now - but I have a great excuse. I have been in CHINA!!!  Between preparing for China, actually traveling, and then coming back I have had little time to blog.  However, I did come back with some inspiration (see below) and will post more soon!


Thursday, November 11, 2010

Who's it from?

Since I started doing gift tags this way for Christmas last year, nobody asks that! To me, wrapping a gift is almost as much fun as picking it out, and I feel like it's another way to show the recipient that alot of thought went into preparing their gift.
Last year, I had the idea to just use pictures in lieu of traditional gift tags. It was alot of fun finding good pictures to use, and we had nearly as much fun trying to guess when the photos were taken as we did opening the gifts!
My littlest niece, Virginia, is about to turn 3 in the next few weeks. She dotes on James and they had soooo much fun together at the beach this year, so I had quite a few good shots to choose from! These were my favorite. I combined them with some fun scrapbook paper I picked up on the Target dollar aisle (a FAVORITE craft supply stop!) for a super-fun, kid-friendly gift tag!


Wednesday, September 22, 2010

Decisions, Decisions....

Project ModernI recently joined a new quilt group, Triangle Modern Quilt Guild, that is based on the new national movement, The Modern Quilt Guild.  I had stopped being active in my local guild when my son was born and I really didn't have time for sewing, better yet meetings about sewing. Recently, I have really gotten back into my crafting (hence this blog) and when I came across the TMQG I knew I needed to give it a chance, and boy am I glad I did.  I have met some wonderful people that are not only my age (I always felt like the little kid at the big kids table at CQG) but they make quilts that look like what I would make (except better). It just feels right.
I would say the biggest issue I run into is how talented everyone else is! There are some heavy hitters in our quilt group that produce some fantastic quilts. I have yet to have the gumption to bring any of my own work, I am not worthy - yet. However, I did sign-up to be part of our Glam Garden Gala Challenge which given a free layer cake of Glam Garden (and seriously who can turn down free fabric) I am to make something.  Everything I come up with is just not good enough, and I don't know what to do.  My top contenders are:

Wonky Log Cabin
via Quilt Dad http://www.quiltdad.com
or
Maverick Stars
via http://marilynbutler.blogspot.com/
possibly a combination of both?!?!
or a

Liberated Cross Quilt
Anniversary Crosses
via http://www.lollyquiltz.blogspot.com/


I even started to design a quilt of my own, but i just don't know what I can actually get done in less than a month.  Should I "Go Big or Go Home?" or should I play it safe?  I just don't know. But I need to make up my mind soon!

Monday, September 20, 2010

Fall Gardening

Ok, in spite of the calendar, it's not *really* Fall here yet, but the Fall Garden is in place, and so far so good! Our summer garden was totally stink-o this year. Between the Squash Vine Borers, Flea Beetles on my eggplants, deer eating my tomatoes, and general malaise afflicting my bell peppers, it was not a very productive summer! There was a sh!t-ton of work that went into that doggone garden for very little output. Oh, well, I did get a buttload of chili peppers, but only because no bugs eat chili peppers. So my hard work this summer has yielded... hot sauce. Poo.
Anyhoo.. Fall. A few weeks back, we ripped up the summer stock and planted neat little rows of cabbage, romaine lettuce, broccoli and collard greens! Additionally, we'd planted some pumpkins and gourds a few weeks prior, along with some carrots. As you can see, these babies are doing SOO much better! Now if I can just keep it well-watered during this dry spell and these 90 DEGREE "Fall" days!!


Saturday, September 18, 2010

Beach Quilt

One of the issues that I always run into as a crafter is that anytime I see something even remotely handmade, I feel like instead of buying it - I should make it.  I end up never making them, or making it and spending about three times the price.  This is one of those times that I actually think I made out better. I had been browsing through the Pottery Barn Catalog a few years ago (~8) and saw a great quilt with a Hawaiian theme. I had been wanting to make a heavy duty quilt that we could take to the beach our use as a picnic blanket and wanted to replicate the look and feel of the one in the catalog.
I bought my fabrics at my first excursion to Mary Jo's, the fabric mecca of the Greater Charlotte Area, while visiting my parents. If you have never been to Mary Jo's it is quite an experience, and although I strongly support my local quilt shops, I love getting a good deal at Mary Jo's. Anyways, back to the quilt.  This was the first time I didn't follow a pattern and decided to make my own. I used a few big square blocks, but mostly I cut thick strips of fabric and created a modified log cabin. Instead of ending with square log cabin blocks, I would stop one or two strips short with a rectangle. I sewed these together to make rows and then voila! A finished quilt top! I free-motion quilted it and outlined a few flowers in the fabrics to vary it a little. I am happy with the results, and even though I would pick different fabrics now, it has held up quite well. It isn't a beach vacation without it!

Thursday, September 16, 2010

What's old is new again


I have several nametags for my little man, James. They go on lunchboxes, backpacks, whatever. The first one I ever made for him (still my favorite) just happened to be the one I grabbed for his camp backpack this summer. Camp.. in the woods, lots of dirt, got taken EVERYWHERE....
Needless to say, it did not weather the summer very well! It was in much need of repair, and I'm happy to say that I took care of that over the past week.

Here's what it looked like when it was new, back in 2007.. I made it specifically to go on his big boy backpack when he went to preschool:


Here's what it looked like post-camp:


.. and after the restoration:

Sunday, September 12, 2010

Mystery Quilts

One of my goals this year was to work on my UFOs (Unfinished Objects) that I had taking up space in my craft room. I started a Mystery Quilt over  years ago, and never really put it together. A Mystery Quilt is a great concept, and a perfect way to stretch your quilting skills. Some stores do Mystery Quilts, or even online magazines, but this Mystery Quilt was created by a member of my MIL quilt group. We were all given a list of all the fabrics we would need for the whole quilt and every month we would receive one step of the process, never really knowing what the end result would look like.  The goal is to finish each step every moth, so that at the end you have a finished quilt.


I came across the main pinwheel blocks a few months ago and decided to actually finish this project. Its funny to see how far I have grown in my piecing skills (or deteriorated, since they everything doesn't match well :)  I have to say I'm glad this was a Mystery Quilt, because I don't think I would have ever gotten this pattern knowing how many triangles I would have to make (I stopped counting after 300).

I hope to finish this up in the next few weeks. My quilt room is such a disaster I have moved my sewing machine to the dining room, and I think my husband would like the space back.

Monday, August 30, 2010

0 for 3


So nothing on my August list has been done! Canning 'maters was out, the little man and I had a cold for most of the week and used the weekend to recover... ditto for Pepper Jelly! Don't get me started on the scrapbook stuff.

What I *did* actually get around to doing was making myself a new keychain. I like to quickly find mine amongst the melee of the other housekeys and "stuff", and it's easier to find in the key basket at the gym! My old one had gotten quite grotty, so I whipped out a new one last week. Not too shabby, and I think I might make some for Christmas gifts this year... (shh!)

The paper is from a K and Company Amy Butler scrapbook pad I bought a few years ago... in fact, the prior keychain used the same paper, I just didn't seal it as well as I should have. Unsealed, well-used Mod Podge gets a little icky after too long! The paper is decoupaged onto a little block of wood approx 1in by 2in by 1/4 in thick. Sides are left natural, but the whole thing was sealed with polyurethane. My trusty Dremel drilled a little hole in the top, and the whole thing is attached with a knotted piece of sturdy, shoelace-like string. Done and done!


Friday, August 27, 2010

Water ATCs

My latest ATC swap is actually due TODAY! So I am a little late in getting them in the mail. We are at the end of our "Elements" themed swap. We have covered (you guessed it) Earth, Wind, and Fire. I hope to make a special display for just these Elements. I myself tend to enjoy the more abstract interpretations. 

These water ATCs are a series of layers. I made a wonky patchwork background of blues. Then I added strips of organza and mesh in white to illustrate the whitecaps of the ocean. (There are some Teal Angelina Fibers thrown in to - because really what is an art quilt project without Angelina Fibers :) I tried to quilt with motions to indicate creating waves, but I'm not sure it translated well.  I decided to add some bead embellishing to give it a bite more sparkle and dimension.

Tuesday, August 24, 2010

Artist Trading Cards (ATCs)

I came across the concept of Artist Trading Cards (ATCs) in an article in Quilting Arts magazine over 5 years ago.  ATCs are baseball trading card size (2 1/2 x 3/12) and as the name implies are meant for trading with others. I am currently in an online group that trades 10 cards per swap on a variety of different themes.

What I love about ATCs and making as well as trading them is how freeing they can be. I can try out a new technique without the time commitment of a huge quilt. I can actually make a batch fairly quickly, and finishing a project is almost as good as starting a new one :) 

However, I struggle with how to display these properly.  At home I have one of those nice glass memory cases where the front of the frame is on a hinge and I can rearrange them at any time, but it only displays about 6 cards at a time. I finally decided on using 12x12 cork tiles (using command adhesive instead of the default foam tape that comes with the tiles). I placed 7 of them across one wall of my office and I have to say - I love the effect. I used plain old straight pins so that I would do minimum damage to the cards as well as make the mounting as invisible as possible. I really love the effect of seeing so many of them in one place, as well as brightening my office. Now I just need to trade enough ATCs to fill up all the new space I have to display them!

Monday, August 16, 2010

Hello, from Geek #2


Hi, I'm Caryn. I live across the street from my good friend and fellow crafter, Bethany! I'm a working mom who stays sane through crafting. Whereas Bethany is the undisputed Queen of All Things Fabric, I'm more of a paper kind of chick. My passions are decoupaging, gardening, canning, scrapbooking, a little beading / jewelry-making, and all of the stuff that fits into the category of "general crafts" if you go to the Michael's website!
I have an insanely funny and artistic 6-year old boy, who LOVES to go to Michael's with Mommy! He's also my best baking buddy (oh yeah, I also bake), and you'll probably see him featured in many of my posts.

So, for your reading pleasure, here's what I have queued up for what's left of August... stay tuned!
  1. Canning 'maters with Bethany and her friend, Amanda
  2. Canning some pepper jelly for this year's Christmas gifts (shh!) and making very fun labels for the jar lids, using my new 2.5 inch circle punch!
  3. maaaaaybe getting around to working on Christmas gift-related scrapbooking projects that are, let's face it, going to actually get done the week before Christmas!
Hope you enjoy reading. Ta!

Friday, August 6, 2010

Welcome to our new blog!!!

Bethany in front of some of her art journal quilts.
Hi fellow blog readers!  My name is Bethany Smith and I am a Crafty Geek, or a Geek Crafter, or crafter of geek stuff, or however you want to see it - these two ideas do not need to mutually exclusive.  I come by my geekery and crafting honestly - I blame my parents. My mother crafted with the best of them, so I learned to sew, paint, sculpt, and glue at an early age. My father had us listen to "The Hitchhikers Guide to the Galaxy (BBC Radio Version)" on the way to 4th grade every day - I had no choice. So the fact that I turned into a Crafty Geek is no surprise to anyone.  My top crafts usually surround fabric, have I mentioned I love fabric, whether it is quilting, making a bag or a costume I love creating with all different types of fabric. I also enjoy scrapbooking and paper arts (although I am woefully behind) and I try to pick up new things along the way. I have a huge appreciation for the craft blogs that I read and the tips, tools and inspirations that they have given me, so this is my way of giving back.  I have invited my dear friend and fellow craft geek, Caryn, to join me on this blog, so hopefully you will get a well rounded Crafty Geek Experience. Here is to a new adventure!